


 Beetle
 T2 Bay
 T2 Split
 T25
T25
 Transporter T4
 Transporter T5
 Golf Mk1
 Golf Mk2


 911
911
 996
996
 997
997
 986 Boxster
 987 Boxster
 912
912
 944
944
 924
924


 Defender
 Discovery Series 1
 Discovery 2
 Series 1, 2 & 3
 Freelander
 Freelander 2


Top tips for fixing classic car headliners
Less blue-sky thinking, more the material that's sitting just above your head. You may know it by several names: Headlining, Headliner or Roof Lining. It's easy to overlook the condition of a car's headlining or simply put off tackling it until you really have to. Yet a tatty, stained, ripped or saggy headliner can ruin the appearance of a tidy original car or one that's looking totally pristine following a restoration. Read on for our top tips for fixing classic car headliners.
Why does a headlining need replacing?
It's not surprising that a vehicle's roof lining starts to deteriorate over time. If there's been a leak from a window seal, water can permeate into the material and create nasty marks, or worse still rot it out completely. Some stains will scrub out, but others won't. Years of baking in the sun can cause a headliner to go yellow, crack or sag and that looks just as ugly. Buying a barn find? You may even find your soft furnishings have been feeding a family of rodents since the vehicle was last in use. Then, of course, every time you get in and out or load something inside there's a chance you'll snag the roof and cause a tear. Either way, without even realising it, a scruffy headlining becomes the thing that lets your car down the most.


Can you fit a new headlining yourself?
Now, if the prospect of fitting a replacement headlining seems daunting, worry not. With the proper preparation, the right tools, and the products at your disposal it's something you can happily tackle yourself. Ok, it's not a five-minute job, and getting the right tension on a piece of vinyl can be a fiddle, but with a little patience, it's certainly doable. Oh, and need we say the job will be so much easier if you remove your front and rear seats as it gives much better access while you're clambering about gluing everything in place!

Pick the right headlining material for the job.
Cars from different eras employed different types of roof liner material, so start by sourcing the right one, in the right texture and colour. A car from the 1950s would probably have used a mohair cloth, but a commercial vehicle might well have had plywood. Vehicles from the sixties and seventies tend to use vinyl and the eighties brought even more choice with either vinyl, a lightweight velour glued to a foam backing, or, in the case of cars like the Mk2 Golf, a fibreboard headliner. Most enthusiasts implement a like-for-like replacement strategy, not wanting to risk a rubbish outcome with a wild card installation technique, but that's not to say you shouldn't buck the trend if you have the skills to hand.
What tools are needed to fit a headliner?
When it comes to tools and products, make a list of the essentials before you get going. While you've got the inside stripped, you might want to fit some extra sound deadening too.
- A selection of screwdrivers and sockets to undo fittings
- Scraper/wire brush
- Sandpaper
- Spray adhesive (high temperature, several cans)
- Adhesion promoter
- Hairdryer or hot air gun.
- Stanley knife/blade
- Decent scissors
- Rubber mallet
- Clips to hold the headliner in place
- Solvent to remove old glue
- Tape measure
- Drill
- Filtered face mask
- A supply of clean latex gloves
- Various fittings/clips
- Plastic spatula/trim tool
- Replacement headliner
- Padding (as necessary)
- Sound Deadening
What are suspended headliners?
Let's kick off with the traditional type where the material is hung on a series of rods that slot into a roof channel on each side, such as a Beetle headliner or a Golf Mk1 roof lining. You can buy kits for these, and fitting is actually a lot more straightforward than you might have first thought. Replacement headliner rods and headlining fixing clips are available should yours be missing. It is worth noting that the Beetle had two different styles of headliner; the 1200 style which was basically a square of material in the centre of the roof. The 1300-1600 models had a headliner that wrapped around the front screen aperture and continued down the pillars too. You need to take out the old roof lining by removing the window glass/seals and undoing fittings like the seatbelt anchor points and sun visors. Grab some photos of where there are folds in the material as a guide to get yours looking the same when you do it.


Fitting a suspended headlining
The headliner is suspended from metal rods, so remove these and number them as they sometimes vary in length and need to go back in the same order. If they're corroded buy new ones, or apply an anti-rust treatment as the rust will eventually come through and ruin the replacement material. Remove any old glue with solvent and sandpaper, otherwise, the new material won't stick properly. It's then a case of going around the inside, starting with the rear window then the doorposts, followed by the area around the side windows before lacing the bows and tackling the suspended roof section. Cut little tabs in the material, apply glue then fold them into the window apertures where the seal fits. The key is to apply adhesive to both the car and the headliner material, tackle little sections at a time, don't rush, use a plastic wedge tool to tuck the headliner where it needs to go, and aim some hot air from a hair drier over the vinyl and work from side to side to help tension and avoid crinkles and creases

Hardboard/wooden headliners
You might want to fit a hardboard or timber roof liner for a more utilitarian look, such as in a Transporter. Some newer vans would have had a factory-fitted headliner panel fitted which is easily marked and doesn't age well. If so, it's simply a case of using the old panel as a pattern and CNC or jigsaw cutting a replacement wooden headliner. On older Vans with just a bare roof inside, it's a case of gluing wooden blocks or spacers to the inside of the roof area and then using these to secure the sections of the board or wood planking. You can get creative here and go for an unusual timber, cover it with fabric, or keep things simple with a plain (or painted) ply. Whatever you chose, it makes sense to apply insulation and sound deadening underneath to keep the warmth in and the cold out and reduce the machine-gun effect of heavy rain. The beauty if you're doing this yourself, is that you can wire up some lighting while you're at it for extra illumination outback!


Fibreboard headliners
Lots of manufacturers, including Volkswagen, used a fibreboard headliner for their cars in the ’80s and ’90s, and sadly it doesn't age well. Temperature changes and dampness causes the original foam backing to disintegrate which in turn results in the fabric covering parting company with the board. Yep, we're talking about the dreaded MK2 headliner sag! We exclusively manufacture the headliner material for Mk2 GTI models, so it's a case of undoing all the plastic pillar trim, grab handles, door rubbers, and other trim fittings and taking the headliner board out of the car. With it on a workbench, the old headliner and foam padding will need to come off first and you'll need to use sandpaper, followed by a solvent-based cleaner to prepare the surface. No joke, it's a messy job. Once that is done, apply a fine mist of an adhesion promoter, which acts as a kind of primer and helps the glue stick properly, before using the spray glue itself. Any cracks in the board itself can be fixed with glass fibre patches or reinforced with heavy-duty tape. A thin layer of foam goes on before the fabric itself to make it look just as it did when it left the factory.


Fitting a headliner to a car with a sunroof
Ironically, it can be a leaky sunroof that's caused an issue with your headlining in the first place, so get it watertight before you fit a new one! Before you worry about cutting in the right place the tip is to glue the rest of the headliner into position, then make a slit (leaving lots of excess material) and stick the material to the sunroof hole, before gluing around the windscreen and the pillars.


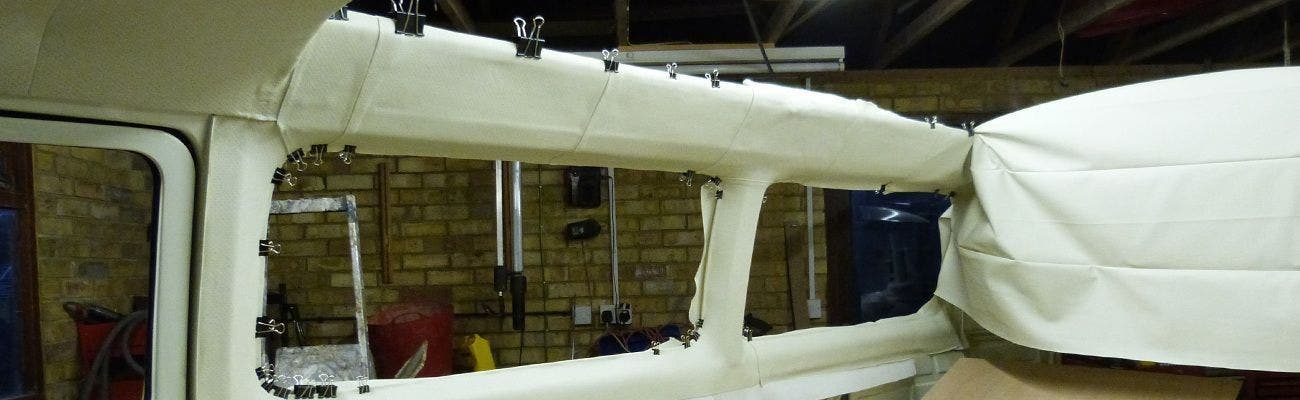
Replacing headliners on convertible classics
Replacing the headliner on a convertible can be more tricky, not least because it's a case of gluing it to the wooden or metal bow at the front before cutting out the aperture for the rear screen and gluing it to the frame. The weight of a glass rear window means getting the tension right is crucial, and with everything having to fold, the margin for error is slim to none. This is probably a subject we will cover in more depth another day.

Top tips for fitting a headlining
Our top tip when it comes to sticking material to metal, such as the C-pillars or window frames is to spend time getting the surface properly cleaned. It's a case of going in heavy with a wire brush or sandpaper and removing any old glue with solvent before attempting to glue on the new headliner. A light mist of adhesion promoter before the glue goes on will be especially useful in making the bond as strong as possible. C-pillars usually have padding underneath, so again spend time getting the profile just right, lifting the metal tabs on the doorpost, slotting the material underneath, then using a cloth to get everything smooth and wrinkle-free. Ensure you are using glue within its suggested operating temperature parameters. You could be waiting for ages in a freezing garage, likewise, it could catch you out and go off extra quick in the height of summer. Having an extra pair of hands to help pass you things will make life a lot easier if you can bribe a mate with a few beers or a free lunch. Talking of hands, change your gloves frequently, to avoid leaving sticky fingerprints while you manipulate it into place.

So there you have it. That's the general principles of getting your headliner looking fresh, taut and tidy, or nicely covered in timber as appropriate. So why not pluck up the courage and have a go yourself? Our thanks to Combe Valley Campers for supplying a number of images, to help us best illustrate and discuss this topic.
Ian / Andy