


 Bug
Bug
 Karmann Ghia
 Bay Bus
 Vanagon
 Eurovan
 Transporter T5
 Rabbit Mk1
 Golf Mk2


 911
911
 996
996
 997
997
 986 Boxster
 987 Boxster
 912
912
 944
944
 924
924


VW Eurovan Restoration Panels Guide
With the eldest of VW Eurovans now over 30 years old, there are plenty on the road which could do with cosmetic attention, not to mention a plentiful supply of projects that have been parked up due to corrosion problems. If you're considering a new camper, panel van, or pickup, or just want to tidy up your own vehicle allow us to guide you through the Eurovan restoration panels available, and anything, in particular, you should look out for whilst shopping.
Do Eurovans rust badly?
VW Eurovans, just like any vehicle made of metal will rust if allowed to. Older vehicles tend to be worse, but then they have been outside in the elements longer than those made later. It just comes down to how well a particular vehicle has been looked after by previous owners. If the underside has been kept clean and the cavities filled with a protective wax you should be ok. The visible bodywork may have been subject to minor accident damage, whether that's misjudging a bollard at the beach or hitting a skip on a construction site. Rust is most likely to appear around the seams, where two panels meet each other, or where moisture can build up for a prolonged period, like around the windshield seal.
Because of their relatively low values, it would be uneconomical to take on a Eurovan restoration if the corrosion or damage was to the extent of an abandoned Splitscreen pulled from a swamp! Vehicles that have reached this point will have been scrapped years ago.
Not bought your Eurovan yet? Be sure to read our T4 Eurovan Buyers Guide before signing any paperwork.
Eurovan front end restoration panels
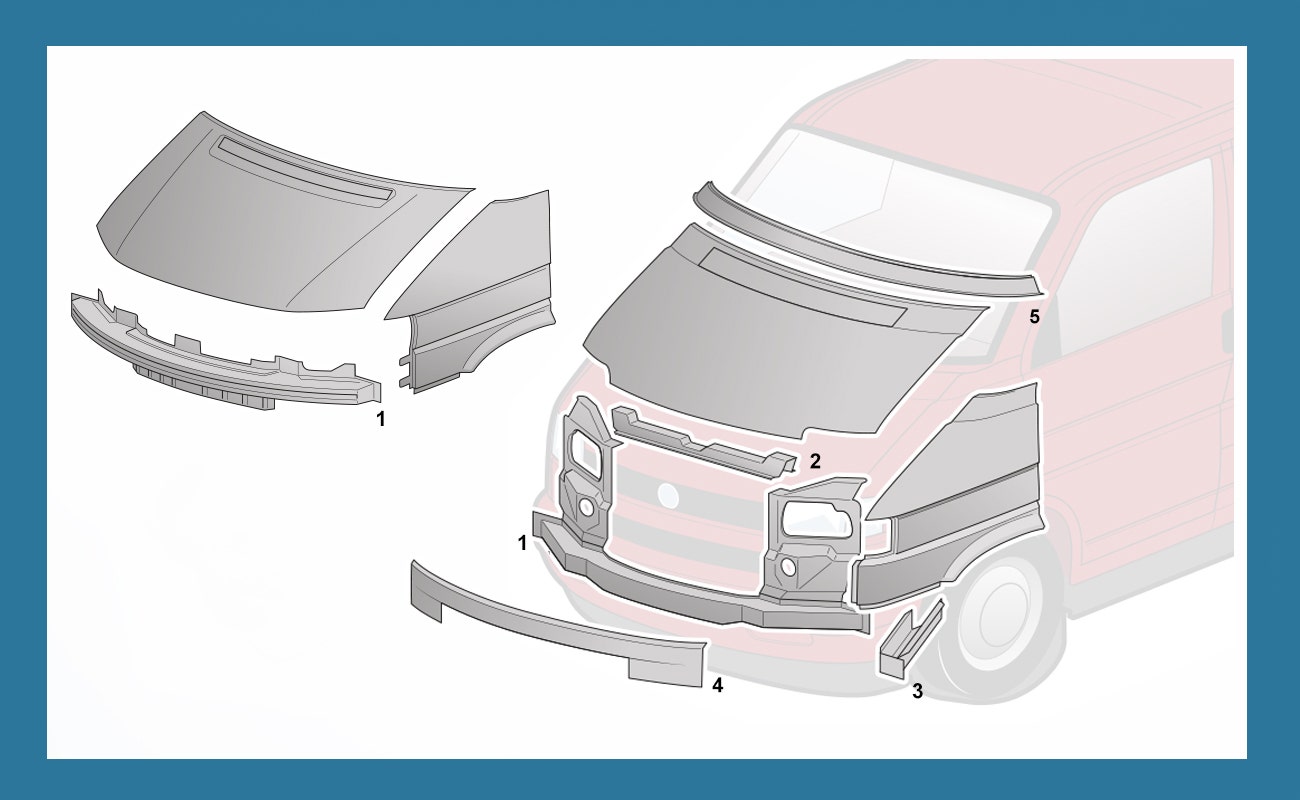
It seems common sense to start this guide at the front, and aided by this handy exploded diagram we can explore the parts your Eurovan may require.
- Front Cross Member. Available for both short-nose and long-nose models the front cross member holds the front of your Eurovan together. If you've bought a project that has been involved in a head-on impact you'll almost certainly need this. It is worth noting the short nose version is available with headlamp mounts included and without.
- Front Slam Panel. Another part which likely to be damaged by an impact, but is equally prone to scuffs and scrapes from tools each time the engine is serviced. The long nose version will need to be sourced second-hand if required.
- The Chassis Outrigger welds onto the main chassis leg and supports the front cross members. These are handed. Find the left T4 outrigger and right chassis outrigger here.
- Front Grille Panel. Fitting under the headlamps and between the upper and lower radiator grille this panel comes under attack by stone chips every time you turn the key! We stock the short nose version here.
- Lower windscreen repair. The T4, like most vehicles, is prone to trapping moisture around the windscreen, and this can easily develop into rust scabs which then lead to holes and water ingress. Get in there early, or do the right thing and fix it properly with a new scuttle panel if you can relate to the latter. Whilst pressed for LHD vehicles, these can be modified for RHD models by creating an additional wiper spindle hole.
- Wings and bonnets (I didn't worry to label these). It's worth pointing out that early short-nose wings are welded on whereas the later (96-2003) version and those found on the long-nose model are only fitted with bolts. You can shop our T4 front wing range here.
T4 sills and side repair panels
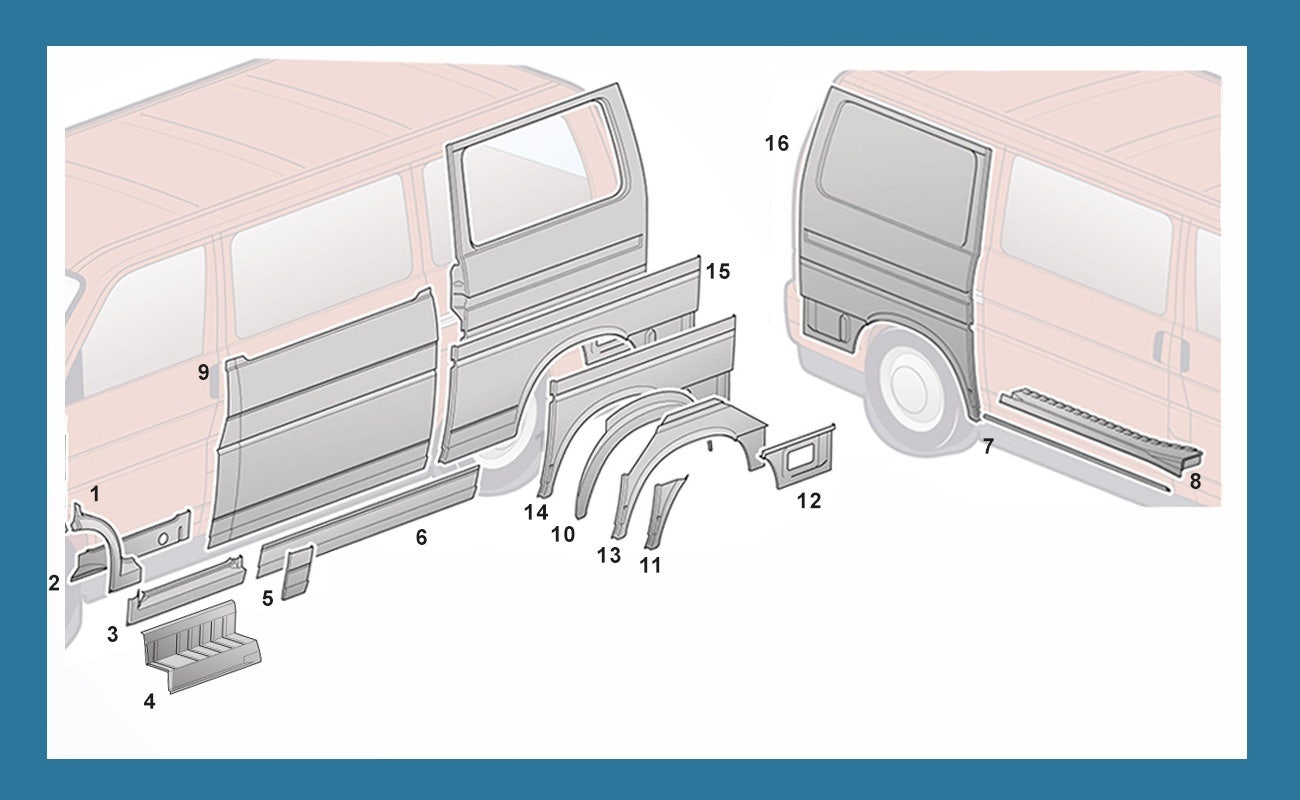
Moving along the side of your fourth-generation Transporter we pick up our range of repair panels that might help you with sills and arches. Let's explore this in a little more detail.
- Outer front wheel arch. Kicked each time you get in and out, not to mention splattered in road salt from underneath, there's little wonder why they rust. The good news is these 5* rated repair panels are zinc plated and will add some structure back into a very important place. Available for left and right.
- Front inner rocker repair panel. This is another T4 panel that has received multiple 5* customer reviews. Produced for the left and right-hand side, they are zinc coated for longevity.
- Front outer rocker repair panel. Enclosing the inner rocker and reinstating the structure below your cab step, these panels take a beating from poorly steered trolley jacks, stone chips, and moisture ingress over time. Fit and fill with cavity wax and treat the exterior with a thick coating of stone chip and paint to ensure a long-lasting repair. Sold individually for the left and right sides.
- Doorstep repair. Handily including the inner rocker panel, this doorstep repair is available for the left and right sides and is zinc plated to help deal with future corrosion attacks.
- Lower B pillar repair panel. This piece will tackle corrosion and physical damage to the lower B pillar, as high as the 2nd swage line. Whilst we grade this as a reproduction quality panel it has been given 5* reviews by our customers, so it should do the job nicely for you.
- Outer rocker panel for non-sliding door side. This panel is designed for the left side of a LHD vehicle, however, the majority of it can be utilized for a RHD van or one with twin sliding doors although the lower outer edge will need to be discarded.
- Outer rocker panel for below sliding door. Manufactured by FORST in the UK and electro-zinc plated for added protection, this panel can be fitted to either side of your vehicle, under the sliding door.
- Sliding door lower runner. We can currently only provide these for LHD vehicles and for the right side of a twin sliding RHD model, although the straight section can be used to repair RHD models if you are happy to do some fabrication work yourself.
- Middle side panel. Whilst pressed specifically for LHD models, we can offer this as a half-height and 1/3-height middle panel including the fuel filler repair section that could also be used to repair a RHD model with some clever cutting about.
- Inner rear wheel arch repair. It may be the outer arch that first alerts you to the corrosion or damage, but when it comes to doing the job properly and removing all the rust, you are likely to need this panel too. Left and right are different, so make sure you pick the correct one or grab both to be sure.
- Rear wheel arch repair front. Looking to perform a localized repair leaving the majority of the original metal in place? If the leading edge of your rear wheel arches is a little crispy this is probably the panel for you. Find the left and right on our website.
- Rear wheel arch repair rear. In a similar vein to the above, if you want to carry out a small repair on the rear of the wheel arch we can also supply repair panels for the section that sits behind the bumper. These are handed so pick the left and right as required.
- Rear wheel arch repair. There are a number of options available for those wanting to replace a larger section of the rear arch or quarter panel. Item 13 is a regular repair panel and we offer these for SWB and LWB models. Item 14 is a full-width 1/3 height panel for SWB models and item 15 offers the same for owners of LWB vehicles. Should it be a major repair then item 16, a full-height replacement quarter panel may be the only solution, fortunately, we can help with this too.
T4 side door repair panels
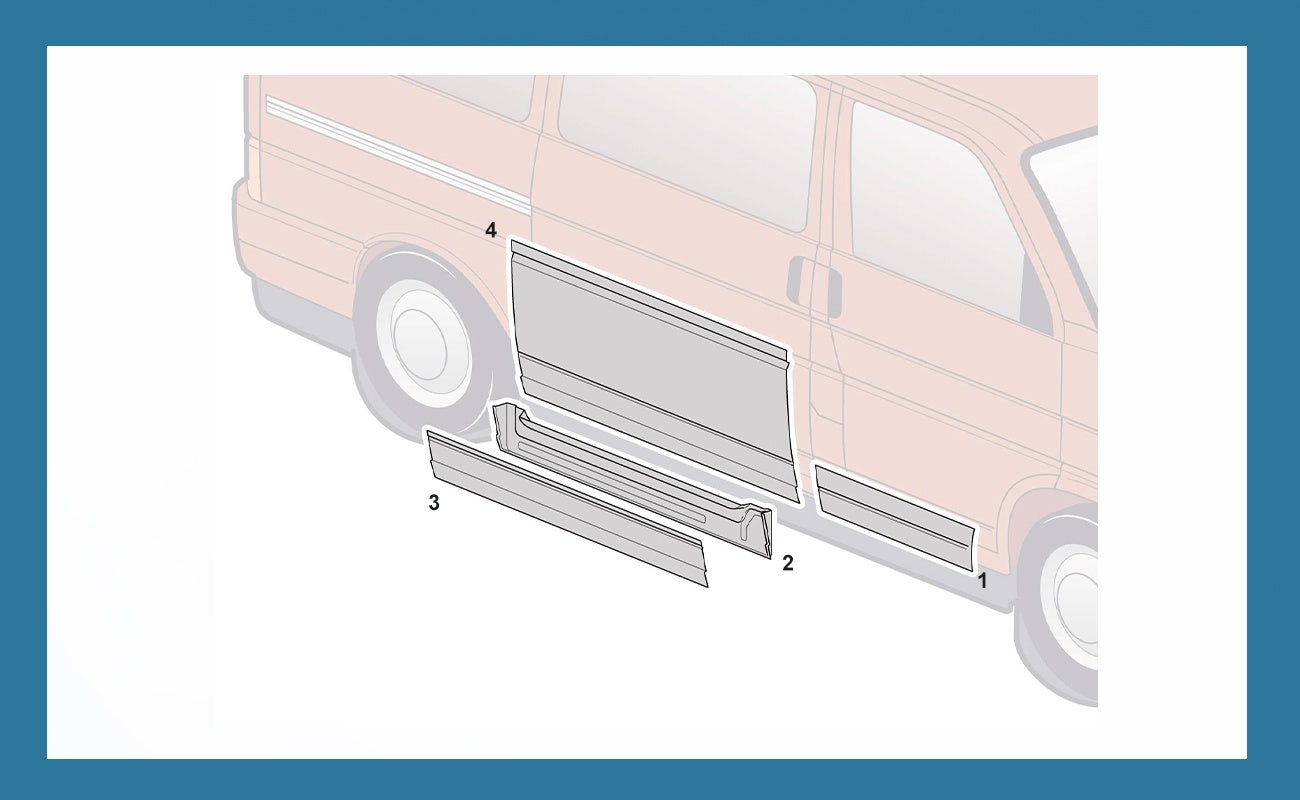
The bottom of doors have always been susceptible to stone chips and corrosion, and because of this, we offer a number of repair panels to return your Transporter to a solid state.
- Lower outer door repair. An outer skin restoration panel to tackle holes or rust bubbles on the lower edge of your left or right cab door.
- Sliding door inner repair skin. Another 5* rated repair panel featuring high-quality zinc plating for longevity. Designed for the right door on LHD models, but can be used as a partial repair for RHD left side sliding doors by modifying the corners.
- Sliding door lower outer skin repair. Measuring 22cm tall, this lower repair panel fits the whole length of the sliding door, and can be used on both left and right-sided doors. Zinc-plated and lead-free to ensure quality welds and surface adhesion of the primer and paint.
- Sliding door mid-height outer skin repair. A taller restoration panel to replace a damaged or corroded sliding door outer skin measuring 57cm tall.
Eurovan rear end restoration panels
Since we made these drawings a few extra parts have been added to our range, namely repair panels to help fix the barn door and tailgate.
For the barn door models we can offer:
- Lower left barn door repair panel. Moisture has a nasty habit of hiding away behind your numberplate and plastic number plate light trim, and eventually rusting the metal away. This repair panel for the lower left side of the Eurovan barn door is the answer.
- Lower right barn door repair panel. Complete with badge recess, this right-hand side lower barn door repair panel is perfect for tackling accident damage or repairing corrosion around the lower edges of your barn door.
Owners of tailgate models can benefit from:
- A complete replacement Eurovan tailgate. If things are really bad, or you are converting from double rear doors, a brand new tailgate complete with window aperture might just be the answer.
- Lower outer tailgate repair panel. As mentioned above, rust behind the number plate trim panel and the plate itself is not uncommon. This zinc-plated restoration panel should help you get things back to normal.
- Lower inner tailgate repair panel. The lower inside edges of the tailgate not only suffer from loose loads banging against them inside the van, but they also trap moisture from the outside and have a nasty habit of becoming crispy with rust. This repair panel will help return your Eurovan tailgate back to how VW specified.


Hopefully, as a Eurovan owner, you will find this guide useful to help you plan your project. Should you need extra help, or have additional questions our team can be contacted by email help@heritagepartscentre.com and will be happy to advise you on what parts would best suit your vehicle.
Want more articles like this? Let us know. You may also find our 911 backdating guide and VW Bug backdating guide of interest.
Andy